 8:31
A look inside the KAM Colour 150 HTI Club/DJ light
Contents of the video
0:00 I love your knobbly bits
Oh, you're so hot and shiny. I love your knobbly bits. Oh, hi. I did a video a while ago demoing the latest tracks from CDPool UK. And in one of the videos I used this light here. It's the DJ Color 150 HTI from Cam. So in my words... Let's take a closer look. Alright guys, here we go and I've put this on the bed so you can see a little bit better. It sounds wobbly, it's because I've loosened these four screws so we can have a look inside. I recommend if you do buy any lights, for goodness sake, don't start opening them up because if you do open them up you could actually knacker the warranty. Right, there it is, that's what it looks like. It's the cam, DJ... Color 150 HTI. So if we open it up, then that is exactly what it looks like inside. Pretty nifty. Right, in this video I'll talk a little bit about the internal workings of this particular light. If you want to see this light in action, look below this video, you'll see a link and that will take you to the actual video where I used this. Okay, first of all what I do like is not one,
Not two, but it's got three cooling fans which is very important because at the end of the day any electrical appliances they do get warm and this will get hot because in there we've got what's known as a discharge bulb. Now basically if you imagine two pins like so, there's no connection but what happens? You actually get an arc and if you've ever looked at a lightning strike that's near enough exactly what happens. So it's a very bright, intense light. And the beauty about discharge bulbs, they will last far longer than dichroic lenses. Those are the lenses similar to what you've got in, say, you know, a light bulb for example. If we have a look at certain areas, like I said, you've got the fans, you've got...
2:58 Basically that stepper motor will move that particular wheel
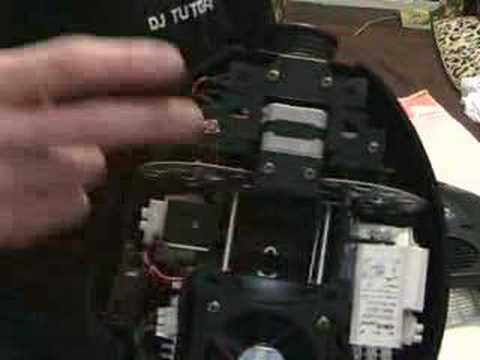
This guy here, which is basically the power supply. What will happen is you'll have 240 or whatever power going in and this will knock the actual power down to an appropriate power needed for this particular appliance. Right, up here you can see that box there. You've got one there and you've got one there. Now those are actually called stepper motors. Now what they will actually do is each one of those is there for one function. is for this piece here. Now if you can see, if I put that up to the camera, can you see coloured glass? If you can take a look there. Now basically that stepper motor will move that particular wheel. Now here you can see another one. There's the stepper motor there. And you can see holes. Now can you see the actual shapes in those holes? Now that is the wheel that actually makes the shapes through
The actual lens, which I'll show you in a second. And that stepper motor will move the actual gobo wheel. That's what it's called, a gobo wheel. Then you've got this guy here. Now you can't see exactly what this one's doing but basically attached to this one you've got a thin sheet of metal. Now what will happen is that will move across the tiny hole where the light shines through and basically you can get a strobing effect or it can Basically make light shine through here, or light not shine through there. I mean, one way of looking at it is because this is DMX controllable, at the end of the day, what happens is these units, when you turn them on, theoretically they should be on all the time. That bulb should be on continually through the night. Just because the light isn't shining doesn't mean to say, oh, the DJ's turned it off. Because basically what happens is when you're using this unit through a DMX controller...
And the DJ has got control of this unit through a DMX controller. The DJ can get this working, get the light shining through here, or get the stepper motor, this guy here, get that piece of black, the piece of metal over the hole where the light normally should shine through and then basically you won't have any light coming through here. Now also what you've got is, this is where the actual lens is. Now if I take that off, there is another lens in there as well, you can see that. Now what you can do with that as well, which is quite cool, is basically, I mean you shouldn't really be allowed, well when I say you shouldn't be allowed to screw that out, I've just made sure so I can screw it out to show you. But the reason for that is so you can actually make sure that you've got a very good image against the wall. So if let's say you have a similar light to this and you think it looks a bit blurry on the wall, then basically just by moving this up or down, it will actually focus the image against the wall.
5:53 Other side
Now, again with this, we've got in and out, male and female, XLR, so this can be used for DMX, so you can have a DMX controller. And there you've got the feature for DMX. Here you've actually got a small little hole, well there's four tiny small holes there. Now basically that is an internal microphone, so if like me, you know, you really want to plug and play, this will actually do sound to light as well. So there you go, basic for you. Well, when I say basic, a basic idea of what this guy looks like. Now if I just, what I'm going to do, I'm going to pause the camera and we'll just show you the other side. Hold tight because I need to put the top back on. Excuse me. OK, last little feature for you. You can see that is basically where you would attach it to let's say a T-bar.
You've got plenty of holes there for what are known as G-clamps. So basically you will attach a G-clamp into here, and guess what? It's shaped like a G, and then you'll just put your stand in there like so. You've got here, that's where it will swivel, and then you've got one there, you can see you've got an attachment there, and on the other side an attachment there, Pretty sturdy. I mean, this is a high-end light. It's not a cheap and cheerful thing. There's a lot of work gone inside this. I mean, some lights today, you open them up and there's about three components. This has got about 300 plus components, maybe probably even more than that. So I'll pause the camera again and I'll just give you a bit of info. Hold tight. Right, here's some info for you with regards any DJ lighting. Number one, make sure that when you set up your lighting...
It's away from sticky hands. In other words, we're not talking about tiny children that have just been eating some chocolate. We're on, really, about adults who are possibly drunk who would like to fiddle and press things. So make sure your lighting is out of the way. Secondly, this is very, very important. At the end of your gig, the last thing you want to start doing is basically taking your lights down and throwing them about the place. Alright, you won't necessarily throw them about the place. But I've seen so many people, they'll take them down, they can't wait to get home and they'll maybe not even drop them but maybe put them on the floor as though it's a bag of potatoes or something like that. Well that's the wrong thing to do because as soon as you've turned your light off whether it be a discharge bulb, any sort of light bulb, that is hot. There's a lot of heat there. Now what will happen, what could happen is if you start knocking that light around too much
After it's only just been turned off, there is a very good chance you could break the bulb. They're very expensive, so look after it. Anyway, I'll say practice and enjoy. Excuse me. Did you bring precautions? Well, you didn't.
This transcript was produced automatically from the audio of the video and may contain mistakes.





