 8:28
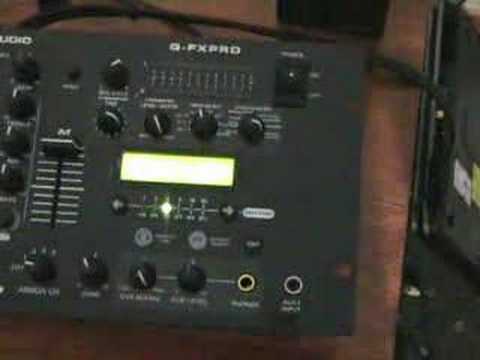
Demo of the Q-FXPRO DJ mixer.
Contents of the video
0:00 Yes, it's Christmas Eve 2007
Alright folks, Jonathan here. Yes, it's Christmas Eve 2007. The missus was playing loud music downstairs, the kids are in the other room and I'm thinking, well, might as well do a quick vid. So here we go, in this one we're going to have a close look, well, sort of a close-ish look at this guy here. It's the American Audio QFX Pro. It's a 19 inch rack mount mixer, a couple of nice features on it, so what we'll do, we'll round the camera a little bit closer and we'll have a look at all of these nice knobbly bits that people like to mess around with all the time. First off with this guy, we've got in brief, this is by the way, microphone 1, microphone 2, you've got bass and treble for your microphone, and you've got a mic 1, mic 2, mute. This guy here is your input for the microphone 1, now it's XLR and it's jack, so if you look in the centre there, I'm only going to poke it in gently, that is a similar plug, exactly the same sort of plug you'd have
On the end of your headphones, the big jack. So you can either have XLR or jack in there which is quite cool. You've got channel 1, channel 2, channel 3 and channel 4. Crossfade here. You can take the crossfade out when you've knackered it because lots of turntablists like doing wiki-wiki and eventually it will wear out. At the end of the day nothing lasts forever. So at least with this guy you can take it out and just replace it. You could literally do it in like five minutes. The channels are assignable, so for example you can have it all on off, so in other words, you've disengaged, you're not using the crossfade and you can just use the channels as follows up and downy bits. Alternatively, you know, you can wang that to say channel 1, so that side will be working on channel 1, and maybe this side here you can have on channel 3. There you go like that. Alternatively, if you're very clever, you could sort of have that channel on this particular side on channel 1.
And then you can have this side on channel 4, which to me is exceedingly confusing, but there you go, it's each to their own really. Now one feature, very quickly as well, channel 1 you can use phono, auxiliary or line, same with channel 2, phono, auxiliary or line. Phono is your vinyl turntable, auxiliary and line, near enough exactly the same thing, your CD player, your MP3 player, cassette player if you want to, anything with that sort of input. You've got your cue here so you can listen through the headphones and again, you know, nice bright light there so you can't miss that really. Bass, mid and treble and gain. Again, a good feature. Minus 30 plus 12. Minus 30 dB plus 12. The last thing you want is plus 30 dB because otherwise you'll end up knackering speakers. So quite a nice feature there. Something I do like a lot where this actually... Excuse me a second. Oh, I didn't want to hear that. I sneezed. OK, what I do like...
2:50 Level, press effects, jack input
You've actually got, believe it or not, four microphone inputs so you can have this channel here on either auxiliary mic in the centre or line. And then again, auxiliary mic or line. And again, I would have thought logically... If you're on channel 3 there like that with a microphone, you can use the bass, mid and treble. So the beauty about this particular mixer I suppose if you've got a whole bunch of MCs wanting to go on the microphone, instead of having one microphone and them fighting over it, you can actually give them a microphone each and just turn all the volumes down. Anyway, we won't go there. OK, so what have we got here? Zone here. What that is, that's basically your booth. So in other words, if you've got your own little monitors, then that's your separate volume control. Here, balance left and right, button there for your mono, so you can go mono or stereo. You've got cue level here for your headphones. You've got cue mixing, so in other words, you can actually listen to only the sound that's coming through the headphones, or half, or you can listen to only what's going through the actual main PA.
That's your input for your headphones. Here, a nice little feature, a tiny little jack input, mini jack input. So, basically I think what they've done there is so you could just wang your MP3 player in there which is quite cool. And then of course this guy's got effects, so what we will do now is we'll press the effects button. I'll give you a small sort of demo. We're going to play a track, it's called Eric, sorry, it's called, it's by Eric B. and Rakim, it's a track entitled I Know You've Got Soul. So what we'll do, we'll press the effects, We've got here, very quickly as well, we've got the parameter. So that will actually change the actual level, not so much the level, but the depth of the effect we want to use. And then you've got level and depth here. Now what this will actually do, this will change the actual sound. So in other words, if we're across here, if we just press them, if we just start the music, hold tight a second. I'm going to turn that up. When you've got to minimum, you can't hear anything. But assume you're going to max.
5:02 What we'll do, we'll just run very briefly through the effects
You've actually got the effects, so in other words what this will do is you can either have the effect on full at max, halfway or you can have no effect whatsoever. And then also this guy here, this will basically determine which channel you want the effect to be working on and then this guy here is all your effects. So what we'll do, we'll just run very briefly through the effects. At the moment we're on the pitch. Change, so we'll play the music again. Let's have a listen. So at the moment now we're on minimum. So if I get a max... So this is basically a pitch changer. If you have a listen, the speed is staying exactly the same speed but we're changing the tone of the track. And reverb now, flanger, auto filter.
In other words, does it itself. Manual filter, you can have a mess around. So this, if you imagine now the track's playing, you can build. And then trans, which is basically transform. And then auto-pan, basically what will happen here, the music will go from left to right. You can see there, left, right, left, right. There you go, bit of an insight for you, hold tight a second. So there you go, bit of an insight for you into this particular mixer and like I've said before, no one's paying me any money to do this sort of thing. This is my personal opinion, if I make any cock-ups. It's entirely up to me, and it's definitely not scripted, otherwise you would hear me saying pristine clear things about how wonderful and fantastic it is. What am I going to say about this? It's a box standard mixer, it's got nice effects, it works, which is of course what you want, it feels robust, the sound is clear, and from, well let's say from a mobile DJ's point of view,
In a sense, a nice piece of kit for you. It's not the best mixer in the world. It's definitely not the worst mixer in the world. I'm not going to give it any marks out of 10. All I'm going to say is that I like it and over the next couple of months I'm going to be having a good old bash with this. So thank you for watching. Practice and enjoy.
This transcript was produced automatically from the audio of the video and may contain mistakes.





