 10:55
DJAY App for the iPad Video 1
Contents of the video
0:01 First screen that you get once
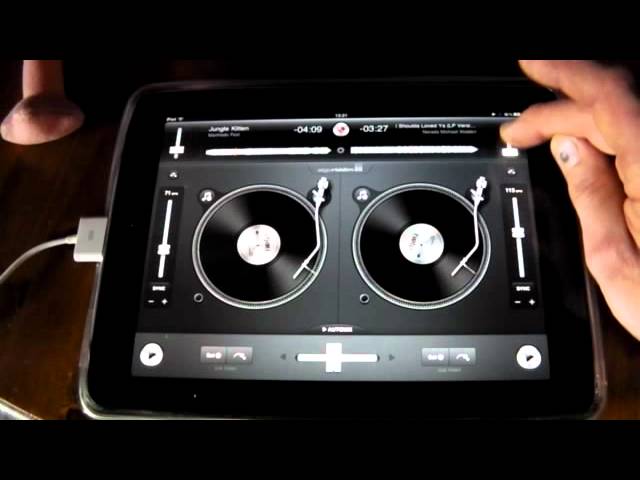
Alright guys, video one on the DJ app for the iPad. Got a couple of friends helping me. There's Pinkieella and that guy there is TY Para. In video one I'm going to explain the first screen that you get once you've pressed the icon for the DJ application. If you're not familiar with anything to do with DJing, video one will explain all of the first screen and what it's about. Now we can see these two circles here. Now if you imagine old school vinyl turntables, that's what they are. The difference being is these guys won't skip, they use digital music and there's no needles on the end. So if the needles break, you're still going to get tunes. Well, that's the wrong thing to say actually because A, the needles will never break and B, you'll always be able to play your tunes because you're using digital music. It's like, duh! Right, so...
You know, what are those for? What does that do? What does that do? In other words, can you imagine a child going, what's that for? What does that do? I will explain what everything does on this first page. If we have a look at the right side, the right side is virtually identical to the left side, excluding this guy here in the centre, which is the crossfade, and also that little red button there. By the way, if you press that, your brain will explode and all the blood will come squirting out of your head. Let's have a look. That guy there is your turntable. If you press the icon to the left of the turntable at the top, press that like so, you will get the screen that will go to all of your tunes that you have in the iPad. In other words, if you haven't put any music in there...
2:22 Over here we have this guy called the pitch control
You probably won't get anything, so you need to press that to get to your tunes. You'll also see the alphabet. I can press on any of the letters of the alphabet and that will get to the relevant songs. If I press on a song like so, you can see all of a sudden that track is being loaded up onto that turntable. If you have a screenshot or some picture associated with that tune, you'll get the picture on the turntable as well. Over here we have this guy called the pitch control. Now what that will do, that will increase and decrease the speed of the track that's playing. This guy here will let me play the track. I'll just give you an example. Put the volume up, press it again and it stops. Press it again and it starts, stops, starts and stops. So what I'm going to do now is play this particular track
It's I Should Have Loved You by Narada Michael Walden. So we'll play this. Let's have a look at the pitch. Have a listen. It's now slowing down. It's now speeding up. And I'm doing that by moving my finger over this area here. What I can do now if I want to, top right hand corner, exactly the same top left hand corner, this icon here. I can increase or decrease the volume of the track that's playing. So for example, let's say you didn't want to mix or anything like that. You could come to this application and you could just happily play your tracks on one deck. But these sets of tutorials are all about taking people who are very, very scared of, let's say, having a mix. And getting you into the art of DJ mixing, because this application will help you. We've got something called Sync. It's got nothing to do with washing up or taps or water. That guy there will let you sync the beats. In other words, if this guy is moving, the sound, the beat, is at this sort of tempo. And say this one here, is that tempo? What will happen?
5:12 You may be thinking, press play, and all of a sudden
When you get these guys into sync mode, they'll both work together. Oh my god, that is so funny. Alright, so let's put the volume back up on this guy. Now, what we can do as well if we want to, like a proper vinyl turntable, if I put my finger on the top, I can stop the music. Take it off, it'll start again. Stop and start. Stop and start. Also, if I want to, I can stop forward. In a future demonstration, I'll be showing you how you can do something like this and do what's known as scratching. Off it goes again. Crossfade. Now, this is quite important because, for example, if we just stop that, if I just move the crossfade over there. Now, you may be thinking, press play, and all of a sudden...
You think it's broken. There's something wrong. You haven't got any volume. The volume's up here. You can see these LEDs flashing, which means there is something playing. The turntable is spinning. But why haven't you got any volume? That's because your crossfade is over the other side. So bring the crossfade across and as you can hear and see by me manipulating and moving the crossfade over from right to left, left to right, I'm able to So what is a crossfade? Well let's have a look at the top here, top right hand corner. You saw earlier on when I pressed that, not press it sorry, when I moved that up and down, I was able to increase or decrease the volume on this turntable. Now let's just imagine, and I'm not going to do it now because it will sound terrible because I haven't chosen the correct track for this side here, but let's imagine we had two songs playing, one on the right and one on the left.
With the crossfade in the middle, and also the volumes on either side, up or halfway, so we're able to hear both tracks. With the crossfade in the middle, I would be able to hear both songs at the same time. If I move the crossfade over to the left, all the way to the left, I would only be able to hear the left side. If I move the crossfade all the way over to the right, I would only be able to hear the right side. Are you making notes Pinkie Ella? Yes, thank you very much. Jolly good. Alright, so again if we just press play, you'll notice now if I bring this over here, we can't hear it. Across again, we can. Over, we can't. And across, we can. In the centre. Set. Now what's that about? What I've done now, I've set a cue point. We can see.
8:37 That in a future video
A small dot moving around the turntable. Now you'll notice this small arrow with a small dot next to it. Have a listen. If you ever heard that on a vinyl turntable, that would normally be associated with a scratch on the record. What I've been able to do there is set a small cue point at that point and by pressing this icon here, I can go directly back to that cue point. We can do more cue points, but I'm going to show you that in a future video. This guy here is the wave format of the track. I can, if I want to, put my finger anywhere on that wave format and you'll notice the arm skipping to a certain part of the track. All that's happening is when I press my finger is going to that particular point on the deck. An easy way of explaining that, if I press the left side of the wave format, that's almost going to the beginning of the track and the arm will go to the outside of the turntable. If I hit there, to the left side, the arm will go to the centre, which is exactly the same way
A normal vinyl turntable will work. It will start on the outside and work its way through to the centre point. Once again we'll have a look at the pitch, slow it down, speed it up. Centre point when we get to zero, if you can see that, if I just zoom in, that when we go to zero is known as the exact speed at which the track should be. Video number one on the DJ app. More videos to come and during the course of the videos I'll be explaining every single part of this application, so taking you from a complete novice into what could be a top DJ. Practice and enjoy. Thank you Pinky Ella and thank you TY Parrot and I'll speak to you soon.
This transcript was produced automatically from the audio of the video and may contain mistakes.





