 16:40
Phoenix4 Live and LaserWorld PM-1300RGB demo video
Contents of the video
0:00 First off, this video is going out to Lee Mills
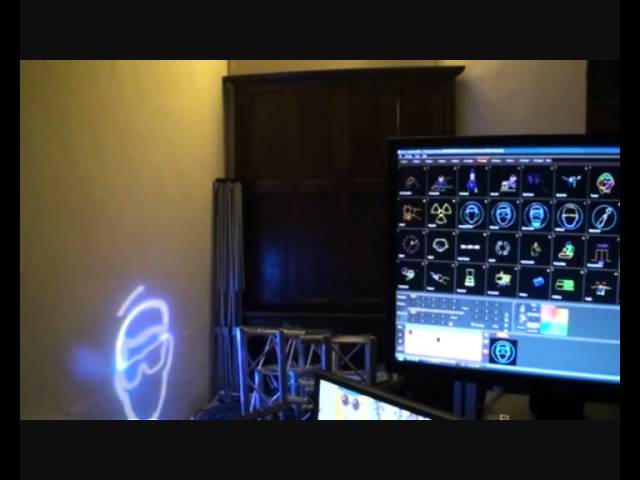
Alright guys, first off, this video is going out to Lee Mills. What we're looking at here is some software known as Phoenix 4. Right, on the back of your lasers, if you've got an input like that, you can use it. You'll also see I-L-D-A, short for, well, it's also known as ILDA. We've got input and we've got output. This is the PM1300RGB. RGB stands for red, green and blue. So there are three laser diodes in this guy here. What we're looking at here is the live version, not the pro version. Now I personally am glad I've got the live version because what we get is, we don't just get that load of effects. If we look on the top here, we have a whole bunch more. And it is very true what they say about this particular version of the software. If you're not familiar with this software at all, within 10 minutes, 20 minutes, you can start making your own shows and I'll show you that in a couple of seconds. So let's have a look at the top here. At the moment we're in F1 beam. If we go to F2, we just click there.
We get another idea of the shows we can perform. 3, 4, 5, 6, 7, 8, 9, 10, 11, and tab 1, tab 2. Hold on, 1 and 2. Let's go back to F1. If I have my mouse over the particular box, The effect move. What we can do now is we can go down here to timeline and if I just zoom in to that area there, again let's say for example this is the first time you're going to use the software without going directly into it and finding out all the workings like I said earlier we can form a show in about 10 minutes. Timeline 1 2 3 4 5 What I'm going to do, I'm going to click on each one of those and just click on the first one, number one. Now that is the first timeline for my first show. And you can see this little line moving across. Right, what I'm going to do, I'm going to zoom out. Those are our effects. These effects are already in this particular program. So let's just leave it about there.
3:18 What I need to do first is I need to highlight shift
What I need to do first is I need to highlight shift. What I can do now using my mouse, I can now click on that and drag that down into the timeline. There we go. What I can do now is I can if I want to extend that like so. Right next to that timeline we've got that small box. Now above that you can see laser off and laser on. That is the sort of effect we would expect to get. But of course that's with the laser off. Up here, we've got 3D preview. What that will show us, it will actually show us what the laser will look like if we're looking from the other side of the laser. In other words, we're not behind the laser, we're actually in front of it. What we need to do though, is we need to turn the laser on. So, click there.
4:57 I'm just going to increase that effect
The laser is now on and if we go up here, I've made the box a little bit bigger and now we can see what the effect looks like. We'll put this into practice very shortly by plugging the laser in as well. Now that's all well and good. We've got sort of that one little effect but how about if we want to add something else? So for example, you know less is more. We've got quite a decent effect there. The box, we've got that running for a certain amount of time and if you notice here, those two icons, we can either decrease or increase the timeline. So if I go over the plus, you can see 670 seconds, 1, 2, 3, 4 and so on, or reduce down the time. So I'm just going to increase that effect. For the entire duration of 69 seconds. There it is. Right, what I'm going to do now is I'm going to go to a different... I'm just going to move that box onto a different screen. So at the moment now, that is on a different screen. There we go. So that gives all this area just for this one part of the program.
Ellaskins, The DJ Tutor.
In the entirety of the box. And if we go over there, we can see what it will look like. Alright, that's all well and good, but how about if we put this into practice? So what I'm going to do now, I'm going to pause the camera and I'm going to plug the laser in. Okay, so here we go. Here is our effect. That is quite stunning and also exceedingly bright.
Okay, bottom right where you can see 28, that's for the speed. So at the moment that's on a relatively slow speed and we can increase that up or decrease it. Okay, what I'm going to do now is I'm going to add a couple of effects down here and you'll be able to see it at the same time on the wall. So let's have a look. We'll have that very strange bloke. And hold on, bring it back down.
8:03 Different skin
And then as soon as that finishes, we should have that clock appear. We can go to a different skin. I'm going to right-click there and delete that. Right-click and delete that. And that looks interesting. We've got some sort of firefly. Again, what I'm going to do, I'm going to just slow that down a bit. I haven't got any music on at the moment because... I don't know if you can hear. You can actually hear the laser working as well. So that looks pretty cool. We'll add something else. Let's have a look. Let's add a horse running. That should come in very shortly. There it is. Now, there's a lot going on there really. Horse is gone. No, horse is still there. It's quite a bit... It's a horse bird. There's quite a lot going on there.
Some figure and then maybe something else. You see, this looks quite nice. So what we'll do, we'll incorporate that over the effect we already have and just drag that across and there you go. Right, what I'm going to do now is pause the camera and get a tiny bit of smoke in the room and then have the camera facing the laser so you can get the effect through the smoke.
10:13 It's just gone off there because the timelines moved
That's what you were looking at there. It's just gone off there because the timelines moved. Let me just increase that. You can notice, or you'll see, as soon as we came in there, the laser started. Something very quickly about this particular laser. What we're delving into here is the realms of pro quality. A laser like this should not in any way be treated as a toy. This is a completely different level. This kind of thing used incorrectly can damage eyesight, period. See again if we look top of the screen that is the effect we would expect to see from the crowd's point of view. I mean it says it all, 3D preview.
11:21 We'll class this as video one
We'll class this as video one. This particular program will also enable you to do your own shows. There is so much more to this than meets the eye, but like I said at the beginning of the video, when you've got this software, it's not as though you're going to open it up, be scratching your head thinking, what do I do? Within 10 minutes or so, you can start forming your own shows. So again, at the moment now, we're on timeline one. So if I, I'm holding the camera as well while I'm moving the mouse. If I go to number two, laser goes off and I can do exactly the same here. Bring my shows, pre-programmed shows down to three, four and five. And here we have the shift button with that off. I can't drag anything down with it on. Guess what? I can. So like I said, within 10 minutes you can start forming your own shows.
13:28 All different shows on different units
Right, what we'll do now, pause the camera, put the lights back on and we'll just have a look at the back of the laser itself and I'll just run through a couple of things. Right, here we go. First of all, you'll notice no DMX and no sound to light. This guy here, again, we're taking it to the next level. X axis and Y, also red, green and blue. Which is the interface. So what you will do, you'll go from USB, from the PC into there and then through the Ilda cable, there's a lot of it, into the unit. And of course what we can do, we can go out into another separate unit. And again, the software will let you do the same show with two units.
All different shows on different units. And again, I'm delving into this particular software. From a scale of 1 to 10, I've probably delved into about 0.05%. There's the unit. This guy here is in the realms of a few thousand euros. This is virtually the lower end of the Pro. And don't get me wrong, it's not lower end. This is the lower end of the pro units they've got. You can pay up to a couple of hundred thousand euros, pounds, dollars for units. And this one here, I believe, don't get me wrong, I think it's about 900 to 1000 milliwatts. That's one watt. Some of the other units you get into the realms of 10, 20, 30 watts. And when you're looking at that kind of power, those are the sort of lasers that you would associate more with outside venues for cities, huge mega clubs etc. Right, what I will do, I will put in the description, I'll put two links, one directly to the Phoenix software.
And also to Laser World where you can get info on this guy. Also what I'll do is I'll put a link to my Facebook page where we used this particular laser at the Mayball for Aberystwyth. It was the Mayball, it was held in Pontre Defender Guide, try saying that when you've had a few, last Friday. So once again this particular video is going at Lee Mills, practice and enjoy. If you watch this video and leave with one thing, treat items like this with respect because they can damage your eyes. Practice and enjoy. Thank you. Awesome. Again, practice and enjoy. Wicked.
This transcript was produced automatically from the audio of the video and may contain mistakes.





