 6:31
Pioneer DJM 2000 firmware update new feature
Contents of the video
0:00 One of the new firmware updates
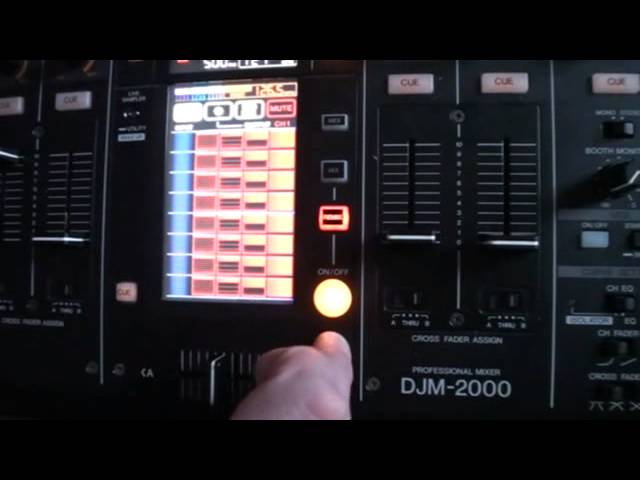
Alright ladies and gentlemen, in this video I'm going to show you one of the new firmware updates on the DJM2000 for Pioneer. Now in this video I'm going to give you a demonstration and a tutorial on some of the functions of this feature here. Now I don't know if you can see, it's a bit like a sequencer. What we can do is we can sample part of the track and we can start to do wacky things in it by cutting up the beats. We can get to this screen by pressing the remix button which is just above the on-off button. Track I'm using is just a drum loop so no worries about the names. So I'm just going to press play on the track, not going to do anything to the screen at all and just take a look at the screen. Now I will explain as well for the partially sighted.
1:55 The, I will concentrate on
There's nothing happening at all on the screen whatsoever. If we have a look at the screen, on the right-hand side we have red blocks fully covered. Next to those red blocks from right to left, we have half-coloured red blocks. Then we have quarter-coloured red blocks, then eighth-coloured, and then far left-hand side we have a blue area. What I'm going to do now is press play. No, in fact, I won't do that. What I'll do, I'll just press the on-off button. I don't know if you can see now, on the left-hand side... We have a line that's going from top to bottom down through the blue area of the screen. Press the on-off again and that line disappears. What I'm going to do now, I'm going to press play on the track, do exactly the same, press the on-off button and we should start to see a wave format appear on the left hand side which is where the blue area is. I'm now going to stop the CD player. I'm now going to press the on-off button. Right, top of the screen.
If we have a look at the, I will concentrate on this area here. We have channel 1, we have the icon there which is a circle with, it's a bit like an off-road wheel. That is there for settings. The next one is SEQ record which is short for sequence record. The next one is mute. Left hand side channel 1, so by pressing that we can choose the channel we want to set a sequence to. Press channel 1 and we will have the readout for channel 1, 2, 3, 4 and so on. So for this demonstration we're on channel 1. Next to that we have settings. So for this demonstration I'm going to look at two main features. First of all we can set the sequence length by 4 beats which is one bar or 8 beats which is two bars. For this demonstration we're using 8 beats. Below there we've got our sync source.
We can set the BPM here, we can set the BPM or set the time. We can do that automatically or manually. For this demonstration I've set the manual icon. If I set Sync Master now, we've got a couple of arrows either side of the BPM reader and a tap button underneath and if I press those nothing happens. If I then press manual I can now manually move The BPM, however I want it. So for this demonstration we're on 127. I'm going to press it like so. So I've used one of the arrows to get it to 127. Alternatively, I can tap, use the tap feature there, and tap in time with the beat. But ideally, get it to do it internally or automatically, or alternatively should I say, press the up or down arrows. 127 BPM on the CD player. I'm now going to press exit, I'm now going to press play on the CD player and then I'm going to press the on-off button. Now we've nearly got a perfect loop. Alright so what are these red areas for? If you have a listen. So that's me tapping one of the blocks that was fully covered in red. All we're getting is one beat. If I tap the next one...
4:45 Sorry, not tap once, keep my finger on it
Which is only half covered in red, have a listen. It's near enough exactly the same as what I was doing earlier on, but instead of me tapping twice, all I have to do is tap once. Sorry, not tap once, keep my finger on it. But if I keep my finger on it continually, then we will get almost like a half beat. If I then press the next icon, have a listen. If I press the next icon, now like anything, it does take a bit of practice. So what's happening... The blocks on the right hand side we're getting one beat, the blocks next to the ones on the right hand side, so from right to left, we're getting a half beat, then a quarter, then an eighth. Now this is a very basic video explaining some of the features of the new firmware update. Now what I'm going to do in this video is put a hyperlink to a video I did exclusively for Get In The Mix where I showed a cool feature. It wasn't even a cool feature, it's a cool way of using this effect.
Taking it to the next level. Now again, if you want to watch that video, what you've got to do is use some of the information from that video and have some fun yourself. And it's all to do with using a couple of channels as well. So some great fun. Go and check out Get In The Mix and also very much looking forward to going to NAMM 2013. Practice and enjoy.
This transcript was produced automatically from the audio of the video and may contain mistakes.





