 23:26
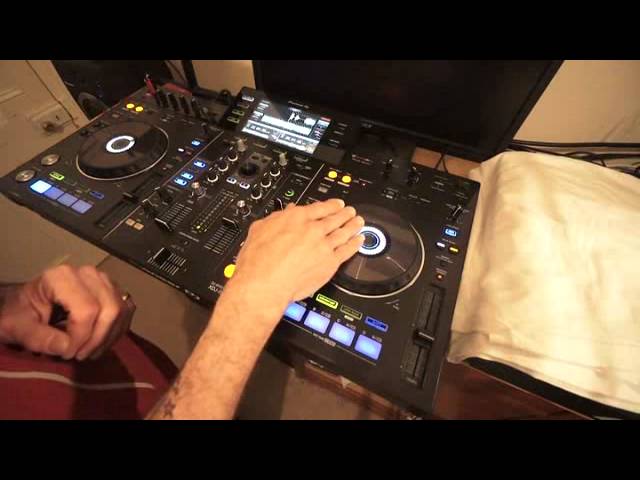
Pioneer XDJ-RX Demo and Review
Contents of the video
0:00 Short overview here of the Pioneer XDJ-RX
Alright ladies and gentlemen, short overview here of the Pioneer XDJ-RX. The DJ system with a bit of style. First and foremost there are no moving parts so it's highly likely it's going to start falling apart because nothing inside here is going to wear out unless of course you start slamming around with the faders. The only things that can start to fade away and die maybe over time All the faders, okay. So bear that in mind, no moving parts at all. How big is the XDJ-RX? Let's have a look. I'll give you a comparison. There is a CDJ Nexus from Pioneer and it's around about two and a bit. So that's how big it is. If you want to know exactly how big it is, then just go to the Pioneer website and you'll see the exact specifications of size and weight. Alright, no moving parts, it's not going to fall apart.
It is USB compatible, so you can plug in your MP3 files and you can pick them up on the screen. But I highly recommend you use the Pioneer rekordbox software because the RX comes to life big time. Track I'm using by the way is Raise Your Hands by Lenny Fontana. The main vocal mix on the right hand side, the radio version on the left hand side. I'll put a link in the description where you can get that as well. And it's by Mr D Train. So... Okay, let's have a look at some of the features. First of all, either side, the turntables themselves, very, very similar to the Nexus series. You've got hot cues, you have track search, of course, you have reverse, you've got slip mode, started off with the 900, everyone loved it so it went to the Nexus 2000 and now it's here on the RX. It is a great feature.
2:12 I'll give you a demonstration
Why is it? Well, if you like to spin back and mess around with the platter but you're always a bit concerned about maybe when you stop spinning back it's going to be offbeat, it isn't with slip mode because what happens is in slip mode, when you engage that, whatever you do on the platter, on the hot cues, the underlying track carries on playing. So, so long as you don't just... On the hot cues forever, if you just tap them, the track will stay in time because the track carries on playing underneath whatever you do with the hot cues or the platter. I'll give you a demonstration. Go into slip mode. Let's do a bit of a spin back. Let's do a hot cue. Reverse it. OK, straightforward track search. Search through the tracks. Search here is search through the track that's playing.
In quantize mode, and you hit hot cue, that's fine. Just 1, 2, 3, 4, 1, 2, like so. But when you start tapping the hot cues quite fast in quantize mode, you won't get what you would expect to get as in relation to tapping. So out of quantize mode, now have a listen. You need to bear that in mind. Auto beat loop. What is that? Right, if we go to auto beat loop, we can loop one beat, two beats, one bar or four bars. So, that's one beat, two beats, one bar or two bars. Now, loop slice is really important and very interesting. When we're in auto beat loop mode, depending on where we are, for example, if we're on Sorry, one bar or two bars. When we go then into loop slice, we will slice up that amount of the loop that we've engaged in auto beat loop. So for example, we're now in one beat. I'm now going to go to loop slice. Now I'm going to slice up part of that beat. It's almost like I'm slicing up the beginning of that one beat loop towards the middle of it.
4:49 Loop slice, back to auto beat
The other side of the middle of it, and now the end of it. Okay, so let's go back to auto beat loop. Now we're looping two beats. Go to loop slice, back to auto beat, loop, one bar, loop slice, there you go. So that's a nice feature. And again, auto beat loop is pretty much using the loop here. Go out of that and I can exit that by pressing the button here that says re-loop exit. Let's just do a normal loop. Okay, so one like that. So I've now manually put a loop into this track. What I can do now here on the cue loop call, I can reduce that by half or double it. So have a listen. Four, one, two, three, four, one. Out. Like so. Alternatively, I can extend that if I want to by doubling it two times. Now you can hear there's a slight kick there. We're out of time very slightly. Now as I said earlier, if you do and I highly recommend you use the rekordbox software, the RX comes to life. So let's just go out of that loop. Going to quantize mode. Now let's see if we can make a mistake. Not. There you go.
7:24 We can go vinyl mode or jog mode, which is great jog mode
See? Infallible. There you go. Right, so if we have a look here, we can see sync and master. So when we're in quantize mode, and of course we're using the rekordbox software, we can, if we want to, we can set either or either turntable to master or sync. What that means is that if you're in master mode on the right hand side, the other one should be in sync. And the other one will follow the BPM of the master and vice versa. We can go vinyl mode or jog mode, which is great jog mode. The whole platter is now the jog part of the RX or per side. So for example, so anti-clockwise we can slow the tune down, clockwise we spin it up. But when you're in jog mode what you have to remember really important
It's so long as you've got your fingers moving the jog wheel anti-clockwise or clockwise, the track will either slow down or speed up. But as soon as you stop moving it, it will go back to the original speed where the pitch is set. That's in jog mode. In vinyl mode... Oops! It's exactly like a vinyl turntable. You put your hand on that platter and it's going to stop. It's really important that when you're in vinyl mode, you jog on the outside and not on the top. I'll give you a demonstration here. Vinyl mode. I've got my finger on the side of the jog wheel and you can hear that I'm slowing the track down. I accidentally then touched the top, which can happen, and all of a sudden we heard that sound. But if you're concerned about that happening, go into slip mode. See? And even though we did reverse the track, the track still plays and still carries on playing in normal times it should.
10:44 Folders, files, etc
Tempo, great, like with all of the CDJ series we have plus or minus 6, 10, 16 and wide. For mixing purposes I highly recommend 6 or 10, 16 and wide, 16, yep that's fine, wide is great for effects. Master tempo on off, what happens there? It keeps the key of the track. When you start to speed or slow the track up or down, out of master tempo, out of quantized mode. So you can have so much fun. I mean, that's just random. Okay, so gives you an idea there. But again, if you just want to mix, stick at plus or minus six or ten. All right, let's have a look at the mixer. Right, if you're familiar with controllers... Most controllers now have got rather large knobbly bits in the middle, which is the equivalent of sort of having a mouse really. Your mouse, you click on your PC, you go to folders, files, etc. Well, what DJs and manufacturers, should I say really, of product like this have realised, you need two components. You need back and you need a toggle switch. So back goes back through where you've been
Here, and also press down to load up. And you can see we've got load for right and left deck. So when you find the track you want, load right or load left. This here is pretty much self-explanatory. If you're not familiar with any form of DJ kit, then maybe look at other videos. I don't want to go too in-depth to this with the RX, otherwise it would take forever. OK, so the mixer... It's fantastic. It is agreed only to channel, but don't worry because what they've done is fantastic. You can also add two external CD players and or two vinyl turntables. And I say and or because you can. On the back there are switches so you can go from phono line which is an external CD player On the right hand side, and also deck two. So the deck two, if you notice here, we've got the LEDs flashing. When I switch this over to phono or line, the LEDs stop lighting up because I've now disengaged the right hand side turntable. If I switch over again, have a listen. All right, so again, really important. If all of a sudden you're thinking, shit, I can't, didn't really say that, did I? Shit, I shouldn't really say shit out loud. Oh, shit.
12:42 Everything's moving, this is moving, the wave format, but I haven't go
Yeah, okay, let's put this side on. Alright, so we've got this side playing, both off, and all of a sudden you're thinking, I haven't got any volume. Everything's moving, this is moving, the wave format, but I haven't got any volume. It's probably because you didn't have it switched onto deck. Okay, trim, yeah, that's your volume control for the channel, treble, mid and bass, The great colour effect and the colour effect dial. Now this is for one, two, three, four effects. Filter has to be the best effect of all time. The next one is Crush. Sounds a bit like an alien's taking over. Now the next one I do like is Gate. Because what that does, or gate and compression, if you imagine you've got a gate. You open the gate a tiny bit.
14:57 I hit that in, bang, straight in time and it's pretty much perfect
And for example, you've got loads of sheep and they're desperately trying to get into the field. If you open the gate a little bit, only one or two can get through, maybe a black one and a white one, and they're all desperately trying to get through. The more you open it, the more sheep will be able to go through to the field, the other field. That's what happens here, is the workings of the RX is letting the peaks of the sound, certain frequencies of that track, I'm going to go to the dub mix, press there and that's loaded up. Now notice as well... I hit that in, bang, straight in time and it's pretty much perfect. Well it is because it's the same track. Okay, but we're not having a mix now. I'm hopefully going to give you a demonstration. Okay, or giving you a demonstration should I say. Alright, so compressor gate. Noise known as white noise. This is when we get that sort of sound. But what you can do is you can use...
The other channel. So I recommend actually that if you do use noise, white noise, you do use the other channel because if you use the channel that you're on, the overall noise itself will be quite prominent in the mix or over the track that's playing. I'll give you a demo. Whereas if you use the other channel then you're able to separate the sounds. You're able to... Look at the volume a little bit more and maybe increase the volume or decrease it over the track that's playing. So if we have a listen. See, it's not so harsh now. Okay, that's finished. Put it back on. Okay, the effects. We have delay, echo, spiral, reverb, trans, flanger, pitch and roll. Let's just have a listen to a few of these. Now again, below the effects select, we have the channel select. One, two, mic.
18:07 Timing by double or half, we can halve it or double it
Delay, echo, spiral, reverb, trans, flanger, Pitch. So really with the pitch what's happening, it's sort of taking the track and making it deeper or higher depending on how you turn the time. Roll. Now, of course, there are a couple of ways of how we can change the effects. One is to use the time function here. Alternatively, we can use this here. There's two buttons above that. We've got beat. Timing by double or half, we can halve it or double it. Also what we can do as well, you can go into three quarters but again don't want to go too much in depth here. Level depth is this dial here will let you increase or decrease the sound of the effect over the track that's playing. Okay, rekordbox mode here, we have MIDI, it is MIDI compatible, USB 1,
The DJ Tutor allows you to record a mix using USB 1 and USB 2, so USB 1 on the left hand side, 2 on the right hand side. One important factor is you can use two USBs to play the tracks. Alternatively if you want to you can use USB 2 to record a mix that you're playing. Now also you can track mark as well, so for example while you're doing a mix Press track mark and then that will set a point in the mix. So instead of having, let's say, a two hour set and you're desperately trying to find track 20, well, if you press track mark in the mix, then you know all you've got to do is find certain positions in the mix. What else can I tell you about this? Microphone. You've got two microphone inputs. And EQ, high and low. So again, some companies, I'm not saying who, but some companies won't even bother putting an EQ. And if they do, at the best you've got one which is a trim, well not trim, sorry, you've got sort of low or high. So it's a great feature. It's a small feature, but for a mobile DJ, the RX is pretty much damn what you need.
20:35 You've got four or five USBs
If you want to use a laptop, then maybe the RX isn't for you. You can use it with software but it's not meant for that. It's meant for USB. And again, mobile DJ. Some people are probably thinking, yeah well how am I going to get all of my files onto a USB and play them to the crowd? Well don't forget you've got two USB slots. So for example... You've got four or five USBs. You've got one with 60s, 70s, 80s, one with 90s, 2000, one with pop, disco, etc. Well all you've got to do is chop and change because you're never going to take them both out. You're always going to have one in. Alright, what else can I tell you about this? Again, headphone sockets, alright, quarter inch and mini jack as well. So that's something that I would like to see on every single mixer full stop from now on.
It's nothing worse than turning up to a gig and thinking, I've forgotten a quarter inch jack. It's not going to happen with this because there it is, ready to go. Okay, headphones, pretty straightforward. Mixing or master, so for example when you set to cue, you will only hear the track that's playing. Mixing, you can pretty much hear both. When you go to master, you'll only be able to hear the sound that the crowd are hearing. Volume control, Q1 and Q2. Crossfade curve, THRU. When it's set to that, it's through. Crossfade is disengaged. Centre point is for good smooth transitions. Across to the right hand side, it's a straight cut. So pretty much if we have the two volumes up and you're on the right hand side and you'll set crossfader curve to the right hand side as soon as you move the crossfade over.
A fraction. You're pretty much going to get the full volume of the left hand side in. When you're on the left hand side, you've got the two channels up and you start moving the crossfade over to the right a little bit. As soon as you've pretty much moved over, maybe even... A quarter of a centimetre, you'll get the full volume of the right hand side. When you're in the centre position, it's more of a smooth transition. So it's more for DJs who like to mix. Don't forget when that flashy lighty button is flashy lighting, it means that the effects are engaged. But of course if you've got your level depth turned to minimum, you're not going to hear the effect. So all of a sudden if you start thinking I want some delay, oh I've pressed that, light's flashing and you don't hear any delay.
Probably two things are wrong. One is the level depth is set to minimum, so you're not going to get it. The other one is possibly because this dial here is not set at the correct position. Alright, so it's a DJ system, DJ RX from Pioneer and it's a nice piece of kit. I'm thoroughly going to enjoy using this. This is going to be out with a lot of gigs. I do like my CDJs but I don't like me back being broken. Anyway, I hope that's been a help. Don't forget, check out Raise Your Hands by Mr Lenny Fontana featuring D-Train. Practice and enjoy. Thank you very much.
This transcript was produced automatically from the audio of the video and may contain mistakes.





