 7:08
Does the platter wobble too much on your sl1200?
Contents of the video
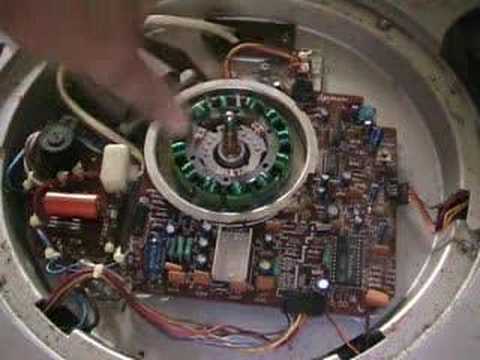
0:00 What you're looking at there is the other half of the motor
Alright folks, now then, you're looking at that and you're wondering, right, what on earth is going on? But basically that is the underside of a Technics SL1200 turntable. What you're looking at there is the other half of the motor. Now there is one half of the motor, okay, that's on the actual platter, and then there is the other half of the motor. Now the reason I'm doing this video, I had an email, some guy said that whatever he's doing, the needle is still jumping on the platter. The anti-skating, etc. Then they emailed me back and they said that the actual platter was wobbling, it wasn't straight. Now then, there could be a reason for that. Now then, if you want to follow this procedure, the only thing I would suggest is when I say do it at your own risk, everything is very, very logical. Now then, two pointers, right? Well, I don't know how many pointers, but just bear with me.
Now one thing is when you unscrew screws, put them in a set together. In other words, when you unscrew, okay, because what you will have is, and by the way this one does need a clean, when you take this guy off here, okay, and of course bearing in mind this is from the SL1200 Mark II, now then you've got these little screws here. Now then, you can either leave them in that, in situ where they are or put the screws together on here somewhere. Okay, bearing in mind, the reason I'm saying this is because you're going to have other screws that are going to come into the equation and you don't want to muddle them up. Because if you do muddle them up and you re-screw a wrong screw into a wrong hole, then what happens is you could knacker the thread. So it's only a tiny pointer but it's worth watching out for. So right, what I've done, I've taken the platter off the turntable, I've then removed from underneath the platter this sort of, it's almost like a piece of plastic that covers
Around that area. Now then, if we look now, what we've got here is we've got this area which is basically the circuit board. Now then, what you'll find, and this is an old SL1200 Mark II, in fact this one's probably about 25 years old so it doesn't need damn good clean. Now then, you'll have three screws. Now then, what you need to do is unscrew those and you remove that area there. Now then, the reason I've done that is because these three screws here The only actual screws apart from the screws that are holding this circuit board down, those three black screws are the only ones that are actually holding the motor spindle in place. Now you watch, if I lift that up, okay, you can see that the other half of the motor is movable now, alright? But watch this, if I pull this up like so, okay, now bearing in mind, you know, you could in fact, if I just undo that bit there
3:19 You haven't got to worry about it
That is the bit that goes to the pitch control. What I can do now is I can take away this guy here, alright? And that now is basically the spindle. That is where the platter will sit. So if I show you, we'll fit that on there like that. There you go. Alright? Now then, the reason I'm doing this is that the guy, like I said, he said the actual platter was a bit wobbly. Now then, there could be a reason, okay? Right, I'll put this back in. And it is, like I've said, this is all quite self-explanatory because underneath the actual circuit board, this particular piece here can only go in one position. So you haven't got to worry about it. If you think about it, and again, here's a bit of advice for you. This is what I used to do in the past. If I, and again it's quite logical, if I pulled apart, say, I don't know, an amp,
What I would do, I'd actually video myself doing it. Now the reason for that is that then if I thought shoot where does that screw go or where does that cord go or this wire go or whatever, then all I'd do, I'd look back at the video and I'd know exactly where it goes because I've videoed myself doing it. Right now then, so what we've got now, we've got this guy here, okay, and we've got this black piece here that sits on there like so. So we line up the screws and theoretically we should be able to press it in like so. Now then, the reason possibly, again possibly, that this guy here was loose is because these screws, one of them, might have just got a tiny bit loose over a period of time. Now then, right, now this is where you need to be careful. Now then, I've got here one of these guys, alright? Now I suggest, highly recommend, you do not use an electric screwdriver. There is a very, very good reason.
4:42 Tight, pressure, movement
And that is that an electric screwdriver has got a lot more power than you've got. Now you know when you're screwing these screws in, you will know when it's starting to get tight but if you don't set the electric screwdriver correctly then what will happen is you could screw them down too tight and then they're going to be an absolute nightmare to get back in or out should I say. So what you need to do is again you don't need to go through all this procedure of getting all of this off and whatever and just showing you that What you need to do is check one, two, three screws, okay? Make sure that they are tight, okay? And you will know if they're tight because this guy here in the middle should not be able to move. Right, if you watch now, if I put a bit of pressure down there, like so, okay, you can see that's pretty solid. But if I let go, I take the pressure away...
You can see there's some movement. There's not going to be that much movement. We're only talking about a tiny fraction, but if you think about it, if you've got a millimetre or even half a millimetre movement here, the further you go out, the more the movement is going to be. And what you have to bear in mind is the distance between this area here and the base of the actual platter is very, very minimal. So again what you have to consider is this, where you have the lip of the platter, Thanks for watching. So it's drunk. Okay, now then, if you think about it, all right, you know, say imagine now the platter is on the turntable and, you know, as DJs you put your hand here on the record and you're actually having a tiny bit of pressure continually there. Now over a period of time, you know, when you're having pressure there all the time, something's going to give. Eventually something's going to give. So possibly that's something to look at when buying an old turntable, all right? Right, bear that in mind. I hope that's been a help.
But you never know, it could help one or two people out there. Thanks for watching, practice and enjoy.
This transcript was produced automatically from the audio of the video and may contain mistakes.