 9:14
Fitting the cartridge to the headshell
On YouTube this video is called How to fit the cartridge( needle / stylus) to the head shell
What this lesson teaches
This is the most awkward job on a turntable and he is refreshingly honest about it: exceedingly fiddly, he is not doing it perfectly on camera, and everybody goes through this. That is worth hearing before you start swearing at it.
Take the stylus off first
The first instruction and the one that saves money.
The stylus assembly usually unclips from the front of the cartridge. Take it off and put it somewhere safe. You are about to spend ten minutes with small screws and slippery fingers right next to a diamond on the end of a hair-thin shaft, and one slip bends it. A bent cantilever is not repairable - it is a new stylus.
The four wires
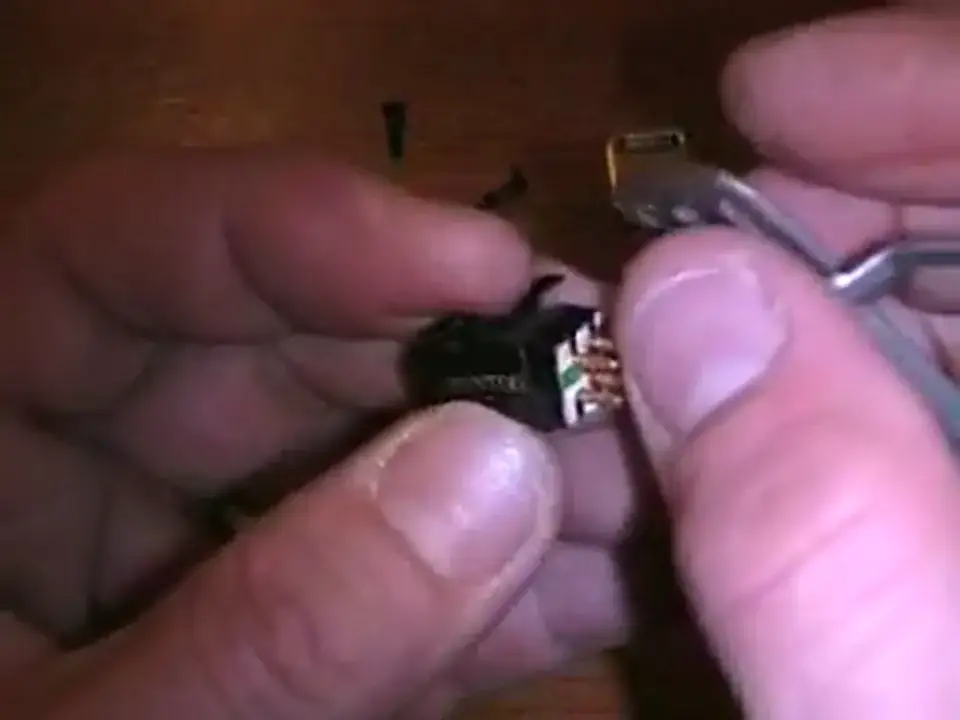
Four thin wires hang out of the headshell: blue, green, white and red. The back of the cartridge has four pins marked with the same four colours.
Blue to blue, green to green, white to white, red to red. No exceptions and no improvising.
For what it is worth, the convention behind the colours is the standard one: red is the right channel's signal and green its earth; white is the left channel's signal and blue its earth. Which is why getting two of them crossed does not simply swap your channels - it can leave one side humming or dead.
His other instruction here matters as much: push each tag fully home. A connector sitting half on will work today and then, after a few months of vibration, start buzzing, drop a channel, or become intermittent - which is the worst of the three, because an intermittent fault sends you looking at your mixer, your leads and your cartridge in turn.
The small plastic pieces
Two little plastic inserts come in the bag, and they look like packing. They are not: they slide into the headshell and give the screws something to thread into. Without them there is nothing for the screw to bite on.
There is also often a very thin plastic shim, and that one goes between the headshell and the small metal weight, so that metal is not resting directly against metal.
The order
Screw, through the headshell, then the shim, then the weight, then into the plastic insert.
Do one screw first and leave it loose. It will feel like nothing is holding, and that is fine - the first screw is only there so the second one has something to work against. Then fit the second.
Leave them loose, then align, then tighten
The reason to keep both screws slack is that the cartridge still has to be positioned. With the gauge from the previous lesson, slide it forwards or backwards until the stylus sits where the gauge says, resting the whole thing on a table so it stays put.
Only then tighten.
And do not overtighten
His last warning and a real one. The screws are threading into plastic. Keep going past snug and the thread strips, at which point the screw spins freely and the cartridge will work loose over the following weeks - taking your careful alignment with it.
Firm is enough. There is nothing to be gained by more.
Contents of the video
0:00 Goes, green white, blue green
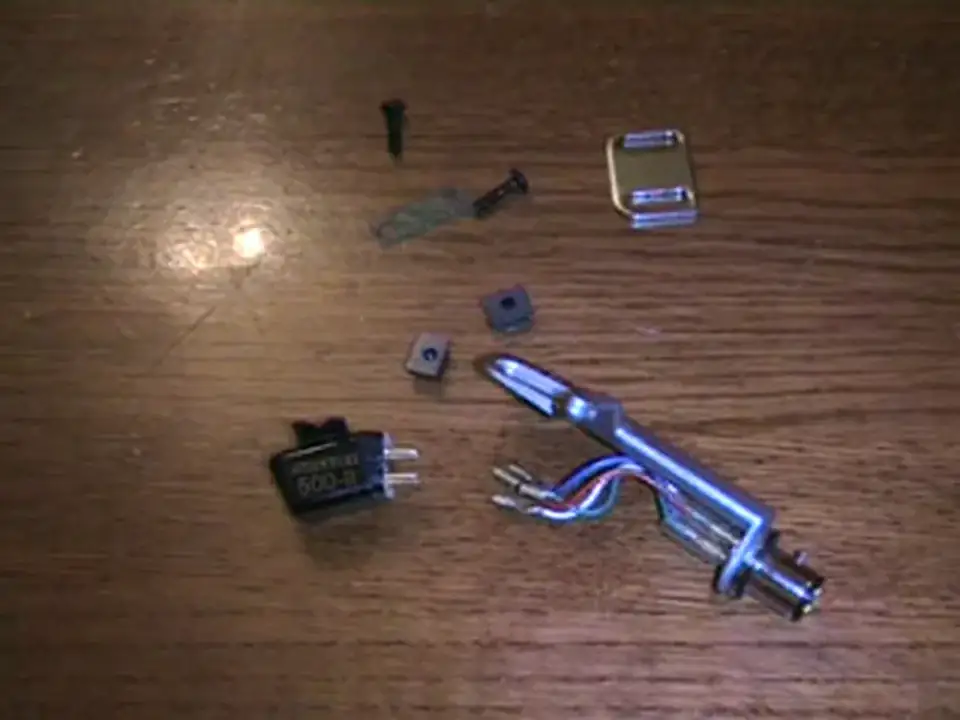
Alright folks, in this demonstration what we're going to show you is how you can fit your cartridge, which is this item here, to the head shell, which is this item here. Now very briefly and quickly, cartridges do differ and of course this is the cartridge, different sizes, different styles etc. I'm going to concentrate mainly on this style of cartridge, if you can take a close look there, and how it's actually fitted and how it should be fitted. Okay, one important factor before we do anything and that is make sure the actual needle or the styli has been removed. There is a very, very good reason for that and that is simply this. You're going to be fiddling around and this is a very fiddly sort of job and the last thing you want is to slip and all of a sudden your finger goes over the actual needle and then because that's a very, very delicate item there is a very good chance you could bend the shaft
2:26 You'll have these two guys here, a piece of plastic
All you have to do is go and buy another one. As you can see, we've got here four thin wires. We have a blue, we have a green, we have a white and we have a red. Now then, if you notice on the back of your cartridge, you have this. You can see here, green, Blue, red and white. Now then, again, it's very logical to a lot of people, but we're going to explain. It's very important that the blue goes to the blue, the green goes to the green, the white goes to the white and the red goes to the red. The DJ Tutor is a great tool for learning how to use the DJ Tutor app. That's very, very important and make sure all of those are securely pressed down. Now when you get a new turntable these four wires will be by themselves. Occasionally they'll be attached to the actual head shell like so but occasionally they will be completely separate so you'll need to attach them to the back of the head shell as well.
You'll have these two guys here, a piece of plastic. Now to someone who doesn't know what they're on about it would look as though why have they put those in the box? But that item fits like so on there. As you can see it slides in like that. So does the other one. Like there, slides in like so. Now there's a reason for that and simply this. Crikey, nearly dropped it. Right, the screw, if you think about it now, if I had that screw, I needed to screw that into here, there's nothing letting that screw fix in place. So, by having that piece of plastic there, the screw now can fit in place, like so. But, of course, what we need to do, what you'll find with some boxes where you've got all your bag of bits
4:27 One screw through the hole like that
The actual cartridge and head shell are concerned, you'll have a weight. Now then, what you need to do as well, also very briefly, occasionally you'll have this piece here as well, a very thin piece of plastic. Now that is there to separate the weight from the underside of your head shell. So basically the reason for that is you have not got metal touching metal. Now this bit here is very fiddly. Now what I recommend you do, again this is exceedingly fiddly, it's very very fiddly in fact. One screw through the hole like that. Then remember your piece of plastic and the metal. So you've got head shell, plastic then the metal. And then that screw will go through like so. Hope you can see that. Now then, to begin with, it doesn't matter if you have a loose fit. OK? And again, you'll need a very small screwdriver. Now then, just secure the first one on, like so. Alright? Now what you'll find, it will come loose, but it doesn't matter because you've actually got that secured ready. OK? So we can fit that back on, like so. Yes, this is exceedingly, exceedingly awkward.
But at the end of the day, believe me, everyone goes through this. It's not easy. Now then, let's have a look. And that one's come loose again. Right, there you go. I do apologise about that, but it is quite fiddly. Alright, now then, very quickly, very importantly, as you can see here, four cables. Red, the red cable is to the red there. The blue is to the blue. The white is to the white, the green is to the green. That is vitally important. Also, just as important like I said earlier, make sure that the connections are as far down as possible, okay? Because if they're loose and if they're only halfway or a tiny bit fitted on, then over a period of time they could come loose and then you're going to lose connections, possibility of buzzing, of loss of signal from one side and then, you know, you might not know where you stand really.
7:19 We'll be able to sit quite firmly on a table or something like that
Now then, what you can see there as well is that at the moment is quite loose. There is a reason for that. Now I suggest you go back and check a video I did one or two videos ago about a small white plastic item whereby your cartridge fits onto that item. Now then, the reason I have got that loose is simply this. If you can get that small white item, fit it in, then by having it loose it means then that at this point now, this is the point at which you can start fitting We'll be able to sit quite firmly on a table or something like that. And then what you need to do is you need to make sure then at that point that you are able to tighten these screws. Now when I say tighten them, don't go mad because at the end of the day, if you tighten them, you've got to take into consideration that the actual screws are going into plastic and if you tighten them too much...
What will happen is you will loosen the thread, or in other words, you'll just go round and round in that plastic, and then you'll end up knackering that, and then there's a possibility of over a period of time the actual cartridge moving all over the place. Now bearing in mind as well that this is a makeshift video, hopefully it's giving you a bit of information anyway, but I'm not doing this perfectly. This is just really to explain to you and to show you how to set up your actual cartridge onto your head shell. Now then, okay as you can see there now what we've got, we've got the small plastic black ears where the screws fit into. Then in between the actual head shell which is here and the small black plastic ears we have that very thin weight that you will
9 times out of 10 you'll get in a new box when you take your turntable out, should I say. Now then, in between the actual head shell and that weight, we've got that very, very thin piece of plastic. Now that is there to go in between the two bits of metal. So I hope that's been a help. Please leave some information if you think I haven't covered certain aspects. But thank you very much for watching. Practice and enjoy.
This transcript was produced automatically from the audio of the video and may contain mistakes.
This video is part of
Related videos
-
Complete Beginner DJ Lessons Tags Key BPM Etc
A more advanced lesson folded in early, and worth doing once rather than putting off, because everything it sets up gets used for years…
-
Complete Beginner DJ Mixing Lessons Video 19 Getting Your Kit Ready for an Easy Mix
A whole lesson on getting ready, which is the right call - the exercise in the next video only teaches anything if the two decks are…