 9:54
How to make a Mobile DJ console by ellaskins the DJ Tutor
Contents of the video
0:01 Ideally I would use ply, I wouldn't use MDF, it's very heavy,
Right guys, video here going out to Cindy and for that matter anyone else who is thinking of making their own DJ console. Two very important factors, first of all is the height of the console, it's of course dependent on how tall or short you are, and the width dependent on the kit you're going to have. If it's a small controller, tiny, if you've got a couple of CDJs and a mixer, it's got to be quite long, so bear that in mind, very important. You do not need good quality marine ply, you can get away with virtually any kind of ply. Ideally I would use ply, I wouldn't use MDF, it's very heavy, and also any other sort of board construction, stay clear of. Try and use plywood, plyboard, because it's a lot more durable and it's a lot more sturdy and solid. Now you don't need three quarter inch, probably I would say five to six mil is fine,
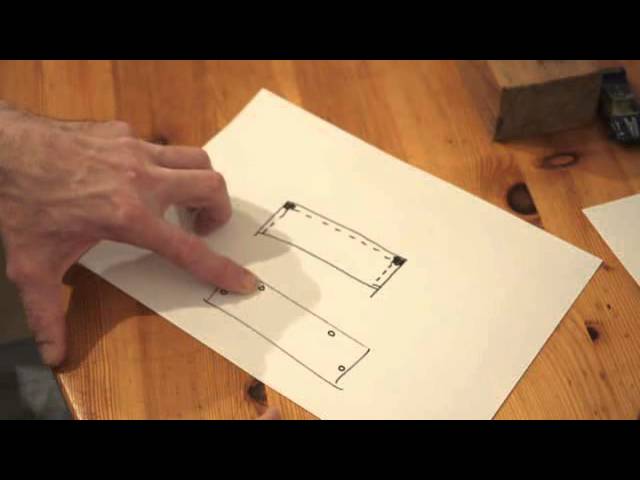
Because we're going to have a framework on your console as well. So if you were going to have a look at it, let's say for example from the DJs perspective, this is the sort of thing you'd be looking at making, something like this. Now if you imagine, alright yeah, alright, nothing is to scale here, nothing is to plan, this is giving you an overall idea. These are your two side bits, that is the bit that will face the crowd. Now first things first, this bit here. The front bit, we need to have some sort of framework. So ideally what you need to do is you need some maybe two by two, three by two pieces of wood and you want to have a piece going across there and this area here, this is the top, that could be anything from eight to ten inches, I'll explain that in a little bit, and the side bits exactly the same.
2:25 Three, piece, holes
You need another piece going across here on the side bit and here on the side bit. Alright, so you're probably wondering why those three bits there? Well of course you're going to have to have somewhere to put your kit on. So if you imagine these three bits now as well are completely separate. They can be or they can't be, alright I'm contradicting myself there. It's better to have them separate because what you need to do is construct this in situ. When you get to the event, you need three pieces. So I don't know if you're familiar with, I don't know the names of them but you need three hinges either side of both of these or these three segments or should I say three hinges in between here, three hinges in between the other side and the sort of hinges they are, are the ones where you will fit one on top of the other so it's almost like it's a post and a locking point like that.
So that's what you need. So of course when you turn up to the event, you've got one, two, three pieces. You bring this one up, you fit that one down on top of it and then by that time if you move it across like that, it's already set up and then it's just a question of then putting the other one down, slotting it in. Now of course you've got these three pieces of timber and they're there for, excuse me, for one reason only and that's to put your top piece on where you will fit or where you will place your DJ gear. So in other words, if I just move that out of the way, what you'll end up with is from a bird's eye perspective now, you have got the side piece, the frontage, the side piece and then you've got your piece that fits on top of that like so and then underneath here, if you imagine now, you've got your pieces of two by three or three by whatever like so.
So that's what the top bit fits on. Now you may notice we've got an area here, I forgot about that, that hasn't got any of those side bits. That's because of course if you have this piece going straight to the end and that piece going straight to the end, you're not going to be able to fit it on top. So if I were you, to save problems, just leave enough gap there. If you're using three by two here, just make sure you've got three inches there or two centimetres or three inches or two inches, whatever it is. So there you go. So the top bit will just sit on top of that. Now again, if you want to, this is a good idea as well, if you imagine you've got your top bit like so and drill four holes right at the edge of that top bit and then the easiest way to do this is while you're constructing the item, fit that onto the piece that's standing up
5:25 Again, this is where having another few pieces of timber around the si
And then drill those holes. Make sure you've got those holes in while it's sat there. Make sure it's secure. What are they for? Well, once you're at the event and you put that top piece on top of there, you don't want that falling apart or coming loose. So all you need to do is get some form of screws. You don't have to screw them down. All you have to do is fit a screw into those four holes or four screws, one into each hole and gravity will keep them in place and of course, in turn, it'll stop that top piece from moving. All right. So that's a very, very simple construction there. But of course it's all well and good having, if we come back to this one, having a piece across there, there so we've got, if you imagine your two by three across there like so, that's all well and good but it's going to be very flimsy so you need to make sure that is quite solid.
So again, this is where having another few pieces of timber around the sides here. So for example, the side bits, you can have them around the side of the side bits and then the frontage, what I would do, I'd have it slightly out from the side like so. And there's a good reason for this. In fact, there's two good reasons, right? Sorry, I beg your pardon. Those bits would come down to the bottom and then you'd have a piece across the bottom there like that. Now if you think about it, let's imagine now we are now looking from the dance floors. Point of view. Now the dance floors point of view, all you would see is a square piece of ply. Now again, you can paint it, you can decorate it, you can do whatever you want to.
7:11 You could put whatever, well, great name, whatever
But why not take it to the next level? Takes a bit of time. It's known in the UK as a jigsaw but you cut a piece out. Try and make sure it's symmetrical and it's central. Fit that with perspex, some sort of perspex you'd normally have say in, you know, the bathroom, your toilet so people can't see through but light can see through. And then you could have an uplight, you could have a light behind that shining through. Alternatively, if you're very clever, you could have your DJ name. You could put whatever, well, great name, whatever. I'm going to call myself whatever. You could have your DJ name cut out. Again, perspex, but you're thinking, well, you know, if my name, DJ name is DJ Derek, DJ Bert, it's going to take forever to cut out Bert.
Well you're not going to do that are you? If you imagine you've got Bert there. So you've got B U R T. Now hopefully some of you are thinking, oh I know where this is going. That's Bert. So you're not going to cut out a B, U and R and a T. What you are going to do though is cut out on the other side a piece of perspex that's just going to fit all the way around there. Once that's set against the Bert, guess what? Then the light will shine through and Bob's your uncle, Fanny's your aunt. All right, let's take it another step further. We have our console like this. Oh, wrong shape. Now modern day technology has given us flat LED. I'm going to put a link in the description of this video so it'll give you an idea of what I'm on about.
But you can get reels of LED and it's exactly like a rope light but it's a flat LED. It's a flat LED. It's a flat reel of it. So what you can do then is you could maybe fit some of it over the top like so,
Giving your console a new dimension lighting of its own light show. Too many people seem to turn up with loads of lights facing out but there are very few lights on the DJ. So it's your chance to pimp up your console. All right, so I hope this has been a help. This one's going at Cindy not Bert. But again, measurements, dimensions. You think about it. The whole idea with this video is giving you the idea of what you can do. The main thing here, the two main points that you need to take into consideration is the height for yourself. You need a good working height for you to work from. Don't have it too high, too low. The other one is the dimensions for your kit. There's no point. Having a Pioneer Wego and having it six foot wide.
Alternatively, you could do something like that and you've got room either side. That's the point. Bear that in mind actually thinking about it. And again, when I do videos, I always try and think while I'm doing the video. Maybe it could be a good option for you to have it slightly bigger, wider, broader, whatever because it means you've got an added surface area to put other items on your laptop, your CDs, your beer, whatever. I hope that's been a help going out to you Cindy and anyone else. Thank you. Practice and enjoy.
This transcript was produced automatically from the audio of the video and may contain mistakes.