 8:21
Showcontroller Laserworld Softwear Video 2 Safety Zones the Importance of Setting Them Up
Contents of the video
0:00 Another video for you on the ShowController software
Right guys, another video for you on the ShowController software. ShowController Live from LaserWorld. So there's the software. Just to let you know as well, I have the LaserWorld Tarm 2.5 which is the hardware. So how did I get to this page first of all? Okay, so I've got the grid there which is the test area for safety zones. Now safety zones are really important when, especially when you're using lasers and you intend to scan the crowd. So, I mean, it's not rocket science but if you are a beginner, I highly recommend, you know, you do not start buying high-end lasers. If, on the other hand, you're a professional. You know what you're doing, then of course you should know logic. Logic should tell you that if you're going to start scanning the crowd with a laser, you need to have safety zones.
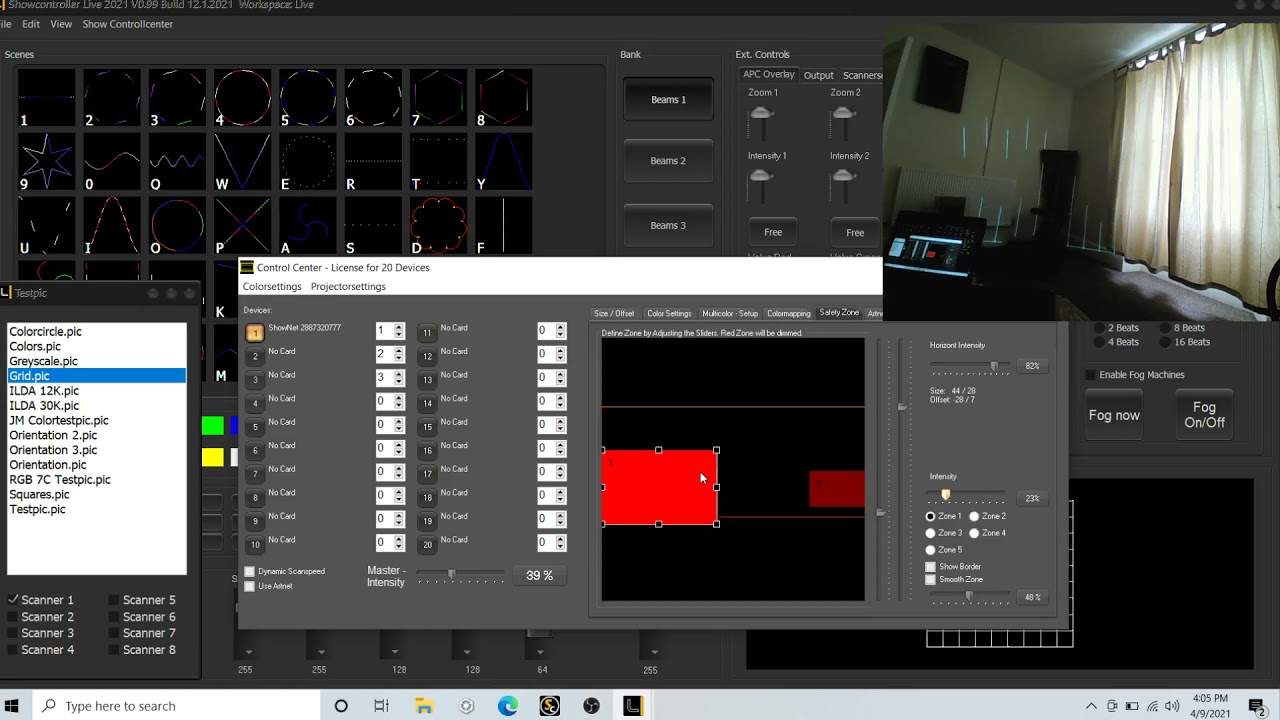
You know, if you're going to start scanning a crowd with a 1, 2, 3, 4 watt laser, then you're a complete idiot. On the other hand, if you're going to do just that, you need to set safety zones and the safety zones are about reducing the intensity of the laser. So, you're not going to run out of energy. You're not going to blind people. You do not want to do that. Okay, so how did I get to this page to begin with? Okay, so basically I went to view. I clicked on test pick and then down here you can see grid and that gave me this grid here. So laser on and now we can see the grid. So let me just move this down slightly. Okay, so we can see here number one is highlighted. Basically because I've only got one head set up at the moment.
If I had two lasers, three or four, then of course we'd have two, three and four. Now very quickly what is very important, pure logic here hopefully, but sometimes even with me logic is just like non-existent. If you think you've got five lasers and you set up safety zones for one laser, then it will be fine for the other four. If the other four lasers are in different positions in the room, then of course it will be fine for the first laser. But because the other lasers are in different positions, the safety zones will be in different positions. So you always need to make sure that you set safety zones for each laser separately. Okay, so you should be able to see with the camera. And again, the laser itself isn't in focus.
It isn't at high power because I haven't got the fans on. But if I show you here, we have two and one. Now if you look at the actual grid, you should be able to see where the grid is missing some of the lines. That's because these are safety areas. Now as I move that safety area around, you can see on the grid that that area is moving as well. So why would you have a zone where there is no light? Where there is no laser light at all? Well, let's imagine you're in a big auditorium and you have cameras in said areas. Now the last thing you want is to ruin people's cameras. And by all accounts, I mean, let's be honest, you know, the cameraman, he or camera lady for that matter, would not want a laser on them at all.
3:43 Zone two and I can move
So you would have what I would class as dead zones where you have no laser at all. Now, again, we can change the intensity there. So I don't know if you can see, but as I move this, we go from practically nothing all the way up to 100. Now I've got zone one. I could go to zone two and I can move that around. Also what I can do, I can increase the size or decrease the size. So again, you know, if you've got some person with a tiny camera in the corner and you just want to make sure that the laser isn't on them and the camera but people around them, then you can set that size however big or small you want. Now very quickly here, what we've got where I've got my mouse now is we have different zones and areas.
So you can see I can move now the cursor up and down the top one and the bottom one. Now anything above here, we can get full power. Anything below here, we can get the intensity based on what we want it to be. So if you look there, I can increase or decrease. But in this zone here, what we will have, we'll have a slow increase up to full intensity. So for example, let's say I've nearly moved the mouse there. Then let's say the crowd, you know, head height or I think by law in the UK, you have to have lasers above three meters off from the crowd. So basically what you can do here is once you have that grid set up, you can then by noting what the grid is doing and setting according to the computer here
6:12 Maybe I haven't got the laser on
And the software, you can set the level of full power here, a slow increase of power. And then here you can have the zone that you can set to maybe 10 percent, 20 percent, 30 percent. Now something here that is very, very important. What I'm going to do now, I'm just going to close that off and let's get rid of the grid. We don't want that now. Laser on and let's say go to hold on. Let me just turn that off. OK, maybe I haven't got the laser on. There we go. All right. I beg your pardon. All right. So with an effect like that and again, the laser isn't full on at the moment. Something like that isn't too bad simply because the laser itself is giving quite a big image. But where you have to be careful is something like that because the laser lights now are dots.
So this is where safety zones are absolutely paramount, because what you wouldn't want is one of those dots hitting someone in the eye. All right. Now, the last thing you want is to get sued simply because you haven't done your homework. And like me, you know, I want to spend a little bit of time working out how to use these lasers correctly. All right. Now, again, I don't want to go into too much detail because I'm not that knowledgeable myself. But as I'm learning myself, I'm hopefully passing on that information to you now again. Thank you very much for watching. And what I will do, I'll put a link in the description to the website where you can get more info on the show controller software and I hope to do more videos on this to go over a lot more.
I mean, again, what I do like about this software, it can be as easy or as hard as you like. I mean, basically, like the first video I did, it's come on, you know, you can click there and you can get an effect. Click that and get an effect. And you can also see letters and numbers. So, you know, you can use your computer tap away and give some kind of interesting show. But then, you know what you can do with this is you can make up your own designs. You can, you know, have words, happy birthday and congratulations and all sorts. The list doesn't end. All right. So thank you for watching. I'll finish off with practice and enjoy. Thank you.
This transcript was produced automatically from the audio of the video and may contain mistakes.